Kurapia is a highly versatile (drought tolerant) groundcover that replaces traditional lawns, groundcovers, and erosion control plants. It establishes fast, is easy to control, and can be mowed into a low cushiony turf or left to bloom into a lush groundcover. Kurapia's low water and low maintenance requirements allows for light foot-traffic, great aesthetics, and even greater versatility.
65%-75% less water than fescue
40%-50% less water than Bermuda
Kurapia
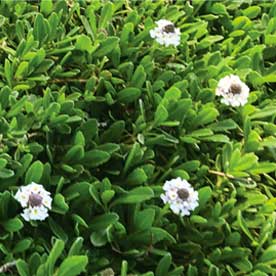
No Mowing
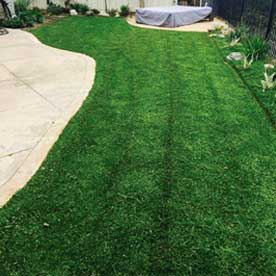
After Mowing
Kurapia is an ideal groundcover. It stays green and lush with minimal work, and remains attractive and pleasurable to walk on. From residential to commercial, Kurapia is an optimal solution for "tough spots".
Name: Phyla nodiflora L. “Kurapia"
Common Name: Kurapia
Plant Type: Evergreen Perennial
Growth Habit: Prostate, Sterile, Non-Invasive
Planting Season: Best in March to September
Flowers: Small, White, May to November
Height: Low growing, less than 1"- 2" high in full sun
Width: Spreading to 6 feet
Exposure: Sun to Part Shade
Drought Tolerant: ETo 20% by drip irrigation and ETo 40% by sprinkler irrigation
pH Tolerant: pH 4-9
Salinity: Up to EC 7ds/m
Temperature: 20°F -120°F
USDA Hardiness Zones: 7b-13b

UC TESTED - LOW WATER USE
EROSION CONTROL


2012 UC Riverside Test - Overhead Irrigation 40% of ETo
2014 UC Davis & UC ANR Test - Drip Irrigation 20% of ETo
75 degree angle slope holds well by Kurapia's mat-like thick root architecture.
LOW MAINTENANCE
RAPID ESTABLISHMENT


Kurapia establishes quickly. Its prostrate growth habit reduces need for mowing.
Fills in ground rapidly and is evergreen in the southwest states.
Kurapia grows horizontally by rooting along the stem, so keeping the stems low will encourage the plant to fill in all directions.
Kurapia's distance between each stem/stolon/node is determined by the amount of sunlight it is receiving and the frequency of pruning. In full sun, with months of mowing/cutting, Kurapia grows tightly together. In shade, stems grow longer and space further apart.
Kurapia's growth direction depends on sunlight and cutting frequency. Each stem is on a mission to expose the plant to more light. In full sun, the plant will produce shorter stems than in the shade, where it stretches towards sunlight. Frequent mowing trains the Kurapia to continue producing shoots that stay closer to the ground.
Kurapia roots grow straight down. They will grow around rocks and objects in the soil but prefer to go straight down in the direction of drainage. Kurapia grows long roots that help it be drought-tolerant.
Kurapia leaves store water in its vascular tissue, enabling it to survive drought, and hold water reserves longer than grasses.
Typically, you can tell the plants are underwatered when the leaves become flat and droopy.
Kurapia resprouts from green stems. Leaves may sometimes fall off the plant, but in warm weather, green stems always grow new leaves and roots when in contact with soil.
Mowing Kurapia down to 1" will force the plant to grow horizontally, increasing the speed of lateral growth and encouraging new sprouts that grow a more dense structure.
Kurapia always and only spreads from the soil surface, so if it encounters an obstacle such as a wall, rock, or a drop in elevation, Kurapia will continue growing long stems in an effort to find soil in whatever direction it's growing.
Kurapia transfers water from roots to stems to leaves during the morning, which is why morning watering is recommended.
Kurapia typically blooms during the warm season, and blooms on growth more than 50 days old. So if you don't desire the flowers, you should mow monthly.
Kurapia stays evergreen when properly cared for and when temperatures are consistently over 38° Fahrenheit (Zone 7b).
Kurapia stops spreading when temperatures drop below 45°, and will go dormant when temperatures are consistently less than 38°. It will green back up as soon as it gets warmer temperatures. The higher the heat, the faster Kurapia greens and spreads.
If you have an existing lawn, it should be sprayed with a grass killer prior to being removed. After a couple days the grass can be cut out with a sod cutter.
We recommend adding 3" of loose organic soil mixture to the area Kurapia will be planted. If you aren't able to do so, you can till the existing soil and thoroughly mix organic mulch into the soil, leaving it loose enough for the Kurapia roots to spread.
If you're planting on sandy soil, consider a top dressing of well-rotted compost, such as a seed-starting planting mix. This will help keep the soil surface a bit wet to help the plugs fill in.
If you are planting around trees and shrubs, consider removing all branches and shoots below 2'. This will ensure the shrubs and trees grow taller and there's still some light penetrating to the Kurapia planting. Thinning of very dense trees and shrubs may be necessary to ensure the Kurapia receives sunlight to intended areas. The more sunlight that reaches the Kurapia the better.
Before planting the Kurapia, water the prepared soil thoroughly a few times. This helps settle the soil and germinates any new weed seeds that are in the soil. They can be easily removed before planting.
You can plant Kurapia plugs year-round, but the green top-growth won't spread in the cold. Planting in warm season will ensure the top-growth will rapidly knit together. Planting in cool season will develop strong roots with less establishment watering needed.
In planting plugs, you can easily plant with a hand trowel to make a hole roughly 2" wide and 3" deep.
If you want to speed up the process, the best way to plant is to use a 2 ½" to 3" auger. Augers create a wide enough hole that the Kurapia can immediately grow new roots. Use that auger to loosen the soil before planting.
When lifting plugs out of the plastic trays, either push up from the bottom or carefully slide the plugs out holding the plug tray sideways. Don't grab the plugs by the base of the plant and pull out.
Plant Kurapia slightly lower than the surface of the soil. The best recommendation is around ¼" to ½" but be sure to plant where the leaves of the plug are still stretching out of the soil and getting sunlight. If the liner of the plug is showing above the soil, the plugs are too high.
Do not use a fertilizer upon plantings; it's not necessary and can damage the plugs. Wait until the plants are established to begin a fertilization schedule.
It's not advised to use pre-emergent herbicides before planting unless there's high weed issues in your area. We suggest Sygenta's Barricade as a solution, trying to keep it off the plants.
Make sure each plug is receiving adequate water and each plug is getting saturated. It will take a few days before the plugs will start to root into the existing soil.
Test irrigation system to ensure even watering is occurring. Be on the lookout of areas where the water collects into pools or areas where the plugs aren't getting adequate watering.
A top dressing of organic mulch can help in most installations. Mulches should be finely ground, dark in color, and shouldn't smell like ammonia, manure, or sawdust. The best products are seed-starting mixes like Kellogg's Topper.
A good quick soak with a garden hose or sprinklers are good to make sure the plugs are planted correctly and the soil isn't too high.
The main goal in this phase is to train your new plants to grow deep roots and start their spreading across the landscape.
Remove any new weeds you encounter with hand tools or precise herbicide sprays (but don't spray on the Kurapia).
Monitor watering to ensure you are wetting the soil deep enough to get the plugs fully wet.
First week, water 2-3 times a day, short waterings, (depending on weather and soil water retention) to ensure plugs don't dry out. Touch the soil to determine moisture to a depth of 3". Add more time on the irrigation clock if needed. Watering should take place during the day and not just at night.
Second week, water frequency may be reduced, depending on weather and soil water retention. Again, touch the soil and rewater when the soil is wet at about 4" down.
Once Kurapia has knit together and covered the whole area, you can start to water less frequently for longer amounts of time to encourage deep roots.
Growing during this time should be fairly easy to manage. The most common mistakes are overwatering, watering too shallow, or watering too frequently.
Irrigation should be dependent on the weather and soil. Irrigation frequency depends on the length of the roots, irrigation style, and water retention.
With proper watering, weeds will be easy to control if you water infrequently, because almost all weeds need more water than Kurapia. Maintain weeds with the weed control methods mentioned in the weed control section.
Mowing is essential to maintain Kurapia signature low and cushiony even growth pattern. For best results mow once a month. Twice a month will achieve a tighter pattern. No mowing will make it look fluffier and produce more flowers.
What kind of soil do you have? Soil is different for everyone, and different soil types hold water very differently. Soil is composed of three major types, sand, loam, and clay.
Sand is the largest soil particle. Sandy soil, as in soil with the highest concentration of sand, drains quickly and the water tends to move straight down quickly. Plants in sandy soil grow with the least amount of restrictions but has less area for the roots to bond with the soil.
Silt is the medium sized soil particle, and it tends to act like sand, but has more surface area, thus holds more water. High silt soil tends to be popular for agricultural use. High Silt soil is where most plants best thrive, due a balance of water availability and space for roots to access water.
Clay is different than other soil particles. It tends to stick together, form sheets, and has a lot more surface area than silt & sand. Various chemical properties add to the clay's ability to hold water. Water in heavy clay soil tends to be held horizontally. Heavy clay soil tends to dry out slower (which can rot plants), but tends to be very dense for roots to grow into.
Sandy soil is typically fine for Kurapia. However, you can increase the soil's ability to hold water by adding fine compost to the top 3" of soil.
In very sandy soil: watering is best in small spurts. Instead of watering for long durations, watering a few cycles will ensure water will fill the soil adequately. Short waterings several times a day until the plants are well rooted works the best for Kurapia plugs.
In heavy clay soil: watering also benefits from slow, water efficient irrigation. However, since clay soil holds water horizontally, you can use underground irrigation emitters, or overhead sprays.
The strategy with clay soil is that it's hard to get the water to penetrate at the start of watering if the soil is dry. Use a soil penetrant to help. You will have to do a short watering to wet the surface, then a longer watering to soak the soil. You won't need to water again for a while.
In ideal soil: which is sandy loam (a mixture of sand and clay), you'll have the most ideal growing situation. You can water most effectively and you'll have good drainage to prevent rotting.
Inline Drip Tubing: A style of tubing that has emitters built inside at measured intervals, that allows more even water distribution and easier maintenance than traditional emitters. One of the mos popular systems is called Netafim. Netafim or comparable products can be purchased at Star Nursery or any irrigation store.
Always install so each emitter flows onto a plug, which takes some planning. For best results, use 12" spacing for the emitters and plant the plugs directly below the emitter (or slightly lower than the slope) to ensure the plugs are watered upon installation.
All soil types can have issues with watering on slopes, so it is always going to be a challenge. The important thing to remember is that Kurapia roots, even on a slope, will grow straight down, so your goal is to irrigate straight down as well. Overall, all spray heads must be aligned to be perpendicular to the soil surface.
Anytime you water near asphalt, a great deal of concrete (like a walkway, a driveway, concrete hardscaping, or concrete / stucco buildings) there will be some heat storage during the hot months. Be prepared to compensate with a little extra water in the hottest months, June to September.
Kurapia typically needs very little maintenance since the plant is continually regenerating itself.
Kurapia New White responds well to a bi-annual feeding of a balanced fertilizer. If it's a liquid, make sure it's no stronger than 10-10-10. If using organic or time-released granular (such as Osmocote) you may use 16-16-16. In our tests from 2019 we found the best results from Grow More's Sea Grow 16-16-16 organic fertilizer or Bonide's liquid 10-10-10 fertilizer. Always water well the day before feeding.
Don't overfeed Kurapia. Applying too much fertilizer will cause the plant to overgrow, and it will need more water and may disrupt watering cycles. Twice a year is adequate unless you have a large amount of sand in your soil.
Don't overwater Kurapia. While this may cause Kurapia to show fast top-growth, overwatering will not develop the deep roots needed for a strong drought-resistant planting. Once the Kurapia is established, cut back the water to strengthen it.
If you soil is draining too quickly (sandy soil), a top dressing of finely composted mulch that's about 1/4" thick will help keep the soil fertile. Apply in early spring.
The plant does respond to growth regulators (such as Cutlass 33G) if you want to mow less.
Being a warm season plant, Kurapia will stay green all year long and won't go dormant at temperatures higher than 45° Fahrenheit.
In Winter, Kurapia's growth slows down. It will not put out new leaves or spread.
If average daily temperatures are consistently below 38° Fahrenheit, Kurapia will start to go dormant, dropping leaves and possibly losing stems. This is normal. Kurapia produces new growth in the warm season.
Kurapia has been known (according to estimates) to survive at temperatures as low 14° Fahrenheit without insulation. Laying sand over Kurapia may help it survive colder winters. Once temperatures start to warm up, Kurapia will start to grow again. You can accelerate this process with fertilizer. (Again, only use liquid fertilizers around 10-10-10 or 16-16-16 organic or time-released). Do not water Kurapia until the weather goes above freezing temperatures.
Usually, the best weed control for Kurapia is good maintenance practices. Removing all existing weeds before planting and watering deep & infrequently will help decrease weeds. For the most part, if Kurapia is established and growing well, weeds shouldn't be much of a problem. Kurapia has wide flat leaves that prevents wind-blown weed seeds from reaching the soil and germinating. However, weeds will still happen. There are three types to be mindful of. For all spray applications, don't mow the area for 7-10 days prior to applying, and water a few days before.
Never Use A Broadleaf weed killer around Kurapia.
Broadleaf Weeds: are characterized by weeds that are not pointed, with wide, netlike leaves.
Removal: Typically, broadleaf weeds come through weed seeds, and can be controlled with removal by hand, or with weed removing tools like hula and scuffle hoes, weeders, and weed cutters. For tall weeds, mowing is really useful as it culls the weeds from producing seeds. They typically cut the weed from the stem, which usually kills it quickly. Barricade is a good pre-emergent to use on established Kurapia to prevent weeds from returning.
Spray: If you must use a herbicide for weeds, spot treat and avoid spraying the Kurapia as much as possible. Some products we've tried that work decently are Bonide Ultra Weed Beater, Monterey Chemical Spurge Power, and Nu-Form Tripower. Keep in mind, these all are not recommended to be sprayed directly on the Kurapia. Also Ortho "Grass B Gon" will kill Bermuda, crab, fescue, and rye grass around Kurapia.
Sedge Weeds: It's very easy to confuse these with regular grasses. The key indicator is a three sided or triangular stem. They also typically have shiny leaves.
Removal: Sedges tend to form little "nutlets" in the soil that are hard to remove by digging up. You can try digging them up but it will take many repeated attempts. Best results come from sprays.
Spray: You'll need the active ingredient known as Halosulfuron-methyl. This is usually found in concentrate form, with such names as Gowan Sedgehammer+ or Nutgrass Nihilator from Monterey Chemical. You may need repeated applications. Follow package directions.
Wilt and Damage Recovery
Sometimes irrigation heads fail, or areas are blocked from water. After enough time, Kurapia can go into pre-wilt. Normally wilt can be recovered with watering. You can tell wilt is occurring the leaves start to become thin and start to droop.
If enough time has passed, plants will go into Permanent Wilting Point (PWP). This is when Kurapia can no longer maintain turgidity (meaning the stems collapse).
If Kurapia hasn't reached full PWP, you can sometimes recover Kurapia by watering properly. You may be able to recover some damage by adding a topsoil of equally water-retaining material (like compost) and sand. If the stems are able to stay firm, they will resprout into new plants.
If Kurapia is damaged by lack of light, simply let the plants get more sunlight. The leaves will start to turn green in a few weeks, or grow new leaves.
If Kurapia is damaged by physical damage (such as being crushed by something heavy like a boulder or a heavy construction vehicle) you may have to replant in these areas.
If Kurapia is damaged by over fertilizing, water deeply two days in a row to flush out all excess fertilizer. We recommend watering with Saponin products to help flush out excess nitrogen from the soil.
If Kurapia is damaged by heavy traffic, giving the area a few months to recoup will ensure recovery. Additionally, consider installing stepping stones, such as pavers or flagstone.
Kurapia and Diseases
Like all plants, Kurapia is not immune to disease and sometimes can get fungal infections. However, the good news is that most diseases can be prevented with proper water usage and regular maintenance. A few facts about fungus:
Fungus spread to new locations by spores. Spores are a lot like seeds, in that they can be transferred via the air, or by being stuck to other objects and transferred to the plant.
A fungus grows into the plant's body, forming new colonies (called Hyphae), that will grow until it runs out of material to reproduce.
Once a plant is infected with a fungus, you typically cannot tell until the fungus runs out of material to spread into. Typically, a fungus will invade the roots and multiply, clogging the plant and making it wither.
The earmark of the fungus spreading is the formation of fruiting bodies to release new spores.
These spores can be obvious signs like mushrooms, or very subtle like a decolorization of the leaves or brown patches in the soil.
Some fungus causes the plant's roots to die, making the plant look like it's not getting enough water.
In order for fungus to grow, it needs to stay constantly moist, most fungal spores go dormant or die when there's not enough water.
If you start to see signs of extreme fungal infestation, you will have to act fast to remove it before it spreads.
Remove the Kurapia in areas where the infection is the most severe.
Kurapia can sometimes fight off fungal infections with applications of Humic Acid, organic fertilizers rich in chitin bacteria, or using a treatment of Sulphate of Potash or SulPoMag to help strengthen root strength.
Scott's Disease X has shown some proper formulation for many infections. Follow the package instructions.
If all else fails, many intense fungus infections can be treated with solarization. This is a method of placing plastic over the soil and letting the sun heat up the soil and incinerate the pathogens. Usually, an inexpensive sheet of clear plastic weighted down with rocks will be enough to do this. Let it remain on the soil for a week in full sun, two for partial sun.
If possible, remove 1" of the infected soil and replace with compost rich soil. The new beneficial microbes in this should keep the infection from returning.
Copper Fungicide Soap, Granulated Sulphur, or liquid fungicides (follow package directions) work as a treatment if you cannot solarize.
Kurapia is an herbaceous perennial, so it will attract animals as it is edible and non-toxic.
If you have foraging animals such as deer and rabbits, you can protect your new planting with fencing off the areas where the Kurapia is planted with fencing or chicken wire. You can also place the chicken wire over the Kurapia (make sure it's roughly 1.5 inches over the Kurapia plugs). Once the Kurapia is established and filled in, the animals should only keep the Kurapia mowed without damaging it.
If you have burrowing animals such as gophers and moles, there's a few tricks to keep them from damaging the plugs. One is cotton balls soaked in castor oil. Soak them and stuff them into the animal holes. The smell will repel them since castor is a very toxic plant.
Honey Bees, butterflies, and other pollinators are attracted to Kurapia's flowers. While Kurapia doesn't produce much pollen, it does produce a lot of nectar that will keep the bees busy. This is good for areas where you'd like to increase pollinator activity such as fruit trees. If you don't want as many flowers, consider mowing more often, 1-2 a month, and mow a bit lower. This will reduce flowering.
Your pets are safe with Kurapia! Kurapia is entirely non-toxic. As much as possible, keep your pets out of the areas where Kurapia is planted during the establishment phase. Dog urine doesn't harm Kurapia! Kurapia can tolerate higher levels of salinity and pH changes that some urine can produce.
As always, feel free to send us an email for any questions or concerns.
Kurapia Orders:
Orders can be placed by calling (702) 645-4070
Phone orders are taken at our office in Las Vegas
Monday thru Friday from 8:00AM till 5:00PM PST
Payments can be made directly to our sales office in Las Vegas or over the phone using VISA, MasterCard, American Express or DISCOVERY. All orders must be paid in advance of shipment
Valley Sod Office
3725 W. Teco Avenue, Suite 9
Las Vegas, Nevada 89118